About

- Pack Rat Studios
- PackRatStudios is a studio that specializes in Developing, Building and Painting Action Figures. A one stop shop for action figure needs! Now accepting commisions (Contact:packratstudios(at)gmail.com)
Sunday, November 25, 2012
Monday, November 19, 2012
Thursday, November 15, 2012
Tuesday, November 6, 2012
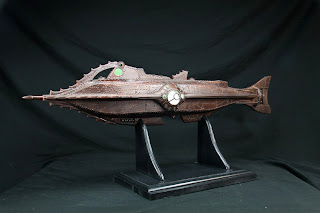
The Nautilus - 20,000 leagues under the sea Build Process
Here is what the Nautilus Body looked like once I finished the "garage work" sessions. The base of the ship was built out of plywood, foam, Bondo, and plasti-card. I then moved it down into my basement studio...
The Nautilus has arouuuuund 36 of these spines/ridges. I sculpted one and did a rough cast, I then reworked that first cast to a final Spine and cast that 5 times and made a master mold that had 5 on it. (then I only had to do a few pours) But here are some spines on the Hull, a test run:
Next: Building the Port Hole windows and dome windows:
I started off with a cutout of the design of the galley windows of the ship, and sculpted it in clay on the body of the ship. I then made a mold and cast two exact copies. I cut out the port holes, and used marbles for those windows. For the main (Large) Galley window I used a magnifying half sphere, I got em off ebay. They are glass and look splendid!
Good Fit...
After that, the slow, tedious job of drilling 5000 holes in the hull and afixing each rivet by hand...
Views of the ship fully riveted, Nose-cone attached, and prop on the back:
View of the Auger at the bottom of the Ship. The Auger was built from a Sawed off Drill Bit. Old and Rusty Junk re-purposed!
Ships Deck, Rear Hatch and Dingy:
Prop, a work in progress: Built from an existing "Spinner" rim off of a RC Car (Chrysler 300 I do believe)
I then added the Prop "stabilizer" /Guard?? dont know what it is exactly...but, probably protects the prop from any damages that might occur from sucking in a Tuna or something...
One of the last "large" project points of this ship was getting the cabin on. Here is the start of what will be the cabin (built from thick gauge plasti-card):
Next, I am going to finish the Cabin, Cut & Affix the nose Bridge, Rear Dorsal Fin, Rivet Deck and Cabin, add 3 more hatches, last and final details and then she goes off to be primed, painted and detailed!
The Nautilus has arouuuuund 36 of these spines/ridges. I sculpted one and did a rough cast, I then reworked that first cast to a final Spine and cast that 5 times and made a master mold that had 5 on it. (then I only had to do a few pours) But here are some spines on the Hull, a test run:
Next: Building the Port Hole windows and dome windows:
I started off with a cutout of the design of the galley windows of the ship, and sculpted it in clay on the body of the ship. I then made a mold and cast two exact copies. I cut out the port holes, and used marbles for those windows. For the main (Large) Galley window I used a magnifying half sphere, I got em off ebay. They are glass and look splendid!
Good Fit...
After that, the slow, tedious job of drilling 5000 holes in the hull and afixing each rivet by hand...
Views of the ship fully riveted, Nose-cone attached, and prop on the back:
Prop, a work in progress: Built from an existing "Spinner" rim off of a RC Car (Chrysler 300 I do believe)
I then added the Prop "stabilizer" /Guard?? dont know what it is exactly...but, probably protects the prop from any damages that might occur from sucking in a Tuna or something...
One of the last "large" project points of this ship was getting the cabin on. Here is the start of what will be the cabin (built from thick gauge plasti-card):
Next, I am going to finish the Cabin, Cut & Affix the nose Bridge, Rear Dorsal Fin, Rivet Deck and Cabin, add 3 more hatches, last and final details and then she goes off to be primed, painted and detailed!
Subscribe to:
Comments (Atom)


.JPG)
.JPG)
.JPG)
.JPG)
.JPG)


.JPG)

.JPG)
.JPG)
.JPG)
.JPG)
.JPG)
.JPG)
.JPG)

.JPG)
.JPG)